

To prevent “halo” edges on your green screen, guarantee even, soft lighting across the background using diffused lights placed strategically, avoiding hotspots and shadows. Keep your subject at least 3 to 6 feet away from the green screen to minimize shadows and uneven lighting. Proper distance and consistent illumination help your software differentiate the subject from the background clearly. For better results, follow these tips, and you’ll discover how to create seamless, professional-looking scenes.
Key Takeaways
- Ensure green screen is evenly lit with soft, diffused lighting to avoid hotspots and shadows.
- Maintain a distance of 3 to 6 feet between the subject and green screen to reduce shadows and uneven lighting.
- Use multiple light sources or softboxes to achieve uniform illumination across the background.
- Keep clothing and props free of green or reflective materials to prevent chroma key interference.
- Adjust lighting and distance in post-production to refine edges and eliminate residual halo effects.
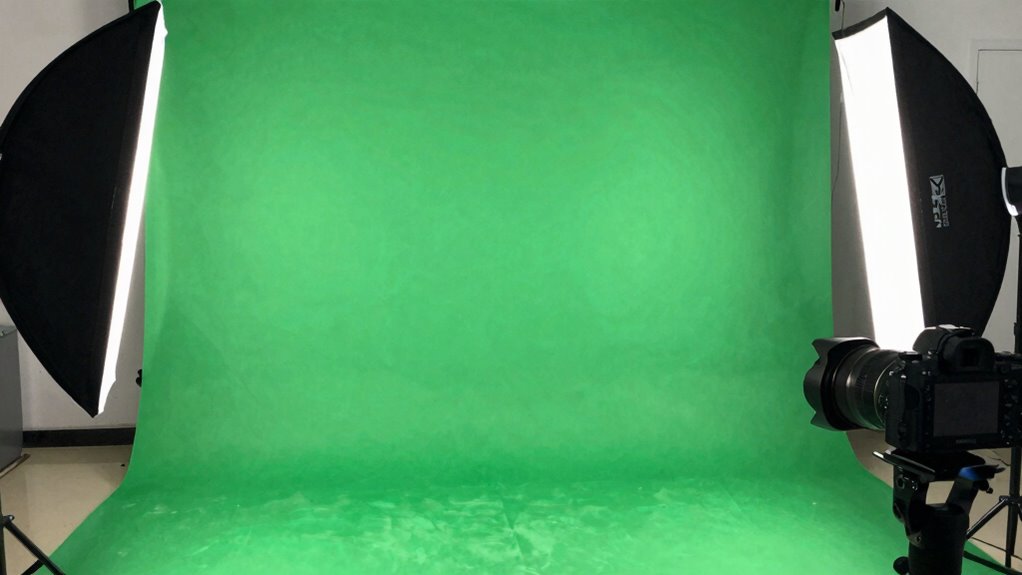
Green screen technology allows you to replace backgrounds in videos and photos seamlessly, giving you the power to create professional-looking scenes without expensive sets. To achieve clean background replacement, mastering proper lighting and understanding the right distance between your subject and the green screen are essential. When using chromakey techniques, uneven lighting and close proximity can cause unwanted “halo” edges—thin, bright outlines around your subject—that ruin the realism of your shot. To prevent this, start by evenly illuminating your green screen with soft, diffused light. Aim for consistent brightness across the entire background, avoiding hotspots or shadows, which can interfere with chroma keying. Use multiple light sources or softboxes to avoid harsh shadows, and ensure the green is lit uniformly. This consistency helps your software differentiate your subject from the background more accurately during background replacement.
Next, pay close attention to the distance between your subject and the green screen. If you’re too close, you risk casting shadows onto the background, which disrupts chromakey techniques. Shadows create irregularities that make it difficult to remove the green seamlessly, resulting in jagged edges or “halo” effects around your subject. Conversely, if you’re too far away, the green screen may appear uneven or get poorly lit, again complicating background replacement. A good rule of thumb is to position yourself at least 3 to 6 feet away from the green screen, depending on your setup. This distance minimizes shadows and allows the lighting to spread evenly across both the background and your subject.
Additionally, keep your subject’s clothing and props free of green or similar shades, as these can blend into the background during chromakey techniques. Use a backdrop made of matte material to prevent reflections, which can cause glare and make keying difficult. When filming, maintain consistent lighting on your subject’s face and body, avoiding colored gels or strong shadows that could interfere with the chroma key process. Also, understanding proper lighting techniques can significantly improve your results and reduce post-production corrections. After filming, use editing software with fine controls to adjust the edges of your keyed footage, reducing any residual “halo” around your subject. Proper lighting and ideal distance are the foundation of successful background replacement, ensuring a clean, professional finish. By paying close attention to these details, you’ll improve your green screen results and make your scenes look polished and realistic every time.

RALENO Photography Lighting Kit, 8.5x10ft Photo Backdrops Stands with 6x9ft Green Screen, 50W LED Bulbs, 5500 K, 97CRI, Umbrellas&Softbox Lighting kit for Studio Portrait Product Photography
COMPLETE PHOTOSTUDIO SET: Whether you are a beginner, amateur photographer or professional, the RALENO lighting set fulfills your…
As an affiliate, we earn on qualifying purchases.
As an affiliate, we earn on qualifying purchases.
Frequently Asked Questions
What Camera Settings Are Best for Green Screen Shooting?
For green screen shooting, set your camera to a low ISO like 100 or 200 to reduce noise, and use a narrow aperture (f/8 to f/11) for sharp focus. Confirm camera stability with a tripod to avoid shaky footage, and employ focus techniques like manual focus or focus peaking to keep your subject crisp. These settings help you achieve clean, professional results without halos or blurriness.
How Do I Choose the Right Green Screen Material?
You should choose a green screen material with a smooth fabric texture to prevent wrinkles and shadows that cause uneven lighting. Opt for a fabric with color uniformity, ensuring consistent green tones throughout, which makes chroma keying easier. Avoid shiny or reflective materials, as they create glare. Look for a matte, non-reflective fabric that’s durable and easy to stretch tight, giving you a clean, professional background.
Can I Use Natural Light for Green Screen Filming?
In the age of smartphones and vintage film cameras, using natural light for green screen filming can work, but it’s tricky. Outdoor filming with natural light offers beautiful, dynamic illumination, yet it can cause inconsistent shadows and color spill, making keying difficult. To get the best results, shoot on a bright but overcast day, and use reflectors or diffusers to control the light and minimize halo edges.
How Do I Edit Green Screen Footage Effectively?
To edit green screen footage effectively, focus on post production techniques like fine-tuning your color keying strategies. Use dedicated software to remove the green background cleanly, adjusting tolerance and edge softness to prevent halos. You can also refine edges by feathering and spill suppression. Always review your footage in different lighting conditions, and make incremental adjustments to guarantee your subject blends seamlessly with the background.
What Common Mistakes Should I Avoid During Setup?
Think of your green screen setup like tuning a musical instrument—every element must be perfectly in harmony. Avoid common mistakes by ensuring lighting consistency across the screen and subject, preventing shadows or uneven color. Keep your subject at an ideal distance to avoid spill or halos, and don’t forget to check for reflections or wrinkles. These steps help create a clean, professional look and make your editing much easier.

Photography Lighting Kit Dimmable 5600K USB Led Video Studio Streaming Lights with Adjustable Tripod Stand and Color Filters for Table Top/Photo Video Shooting
【MULTIPLE-USE LED LIGHTING SET】 The small LED panel light (5.73×3.78 inches/14.5× 9.6 centimeters) can be 180 degree adjustable,…
As an affiliate, we earn on qualifying purchases.
As an affiliate, we earn on qualifying purchases.
Conclusion
Mastering green screen lighting and distance is like tending a delicate garden—you need the right balance to prevent unwanted “halo” edges. I once watched a beginner struggle with uneven lighting, only to discover that a small adjustment in distance made all the difference, like pruning away excess branches to reveal a vibrant bloom. When you fine-tune your setup, you’ll find your footage transforming from muddy to crisp, turning your green screen into a seamless window to any world you imagine.

EMART Green Screen Backdrop Kit with Reverse Folding Base, 5×6.5ft Photo Greenscreen Background with Portable T-Shape Stand and 6 Clamps for Photography, Photoshoot, Studio Video Recording, Streaming
Reverse Folding Stand: Highly portable, comes with a carry bag for easy transport. Larger unfolding area, better stability…
As an affiliate, we earn on qualifying purchases.
As an affiliate, we earn on qualifying purchases.

LYLYCTY Green Screen Photo Backdrop, Chroma Key Background for Photography, Live Streaming, Zoom Video Studio, Online Courses 6x9FT
Backdrop details: The green backdrop is made of fabric polyester which is machine washabele and ironable. The size…
As an affiliate, we earn on qualifying purchases.
As an affiliate, we earn on qualifying purchases.